Setting up GIT on Bluehost
So, decided that since you’ve gone and bought VPS hosting services through Bluehost and you now have root access and an isolated virtual server you can do some interesting thing? Well I firgured at this point GIT would be handy and probably a straight forward installation process but due to a couple of minor hiccups it took me way longer than I expected.
Thus here are a few pointers which, had I have known beforehand would’ve made this a quick process.
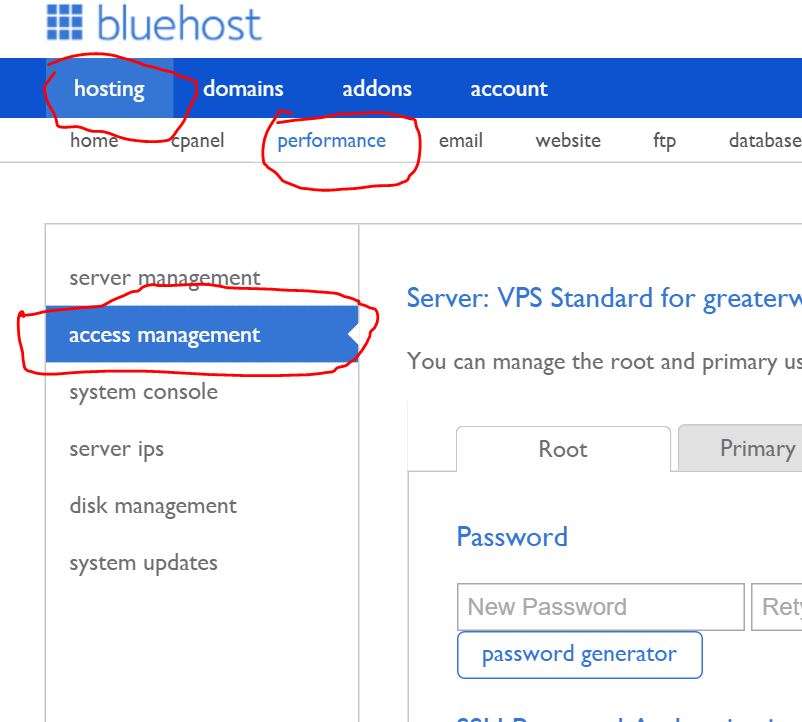
- Check whether you’ve actually verified your account on Bluehost. If you haven’t verified your account (which you might not have noticed if you had a standard hosting account) like I had things work merrily except that SSH access doesn’t. To check go to your cpanel -> server/performance ->accessmanagement as per below:
- Verification was a bit of an annoying process. We emailed Bluehost as per their instructions given here. Sending the pictures of cards in is easy but they didn’t respond quickly. As this received no response after a day of waiting we called them and were verified in about 10 minutes. I’d say just give them a call and get it sorted out quickly (or verify your account when you signup even if it’s not of interest to you initially). That choice wasted a day of my time.
- When the site was verified I had enabled ssh access from the cpanel (same location as above), while it said it was enabled it didn’t seem to be working. After stuffing around for quite some time as the ssh login connects, prompts for a user and password then reports ‘access denied’ which simply means Bluehost has not allowed you ssh access. There is nothing much you can do remotely to correct this beyond contacting Bluehost who after chatting to their tech support corrected the issue somehow (maybe something magical in the background). They didn’t give much explanation, so again my advice is just contact them via the chat as soon as that occurs and don’t waste time.
- GIT installation. Don’t follow any guides telling you to download make files etc, I did and had to bugger with CURL and other packages which didn’t have their expected dependencies. Why oh why did no one just say install it using Yum, maybe the guides were out of date or maybe it’s because Bluehost’s guide just doesn’t come up high enough in the search results. Either way its simplest to install GIT using YUM from the command line i.e.
- SSH into your site
- Enable sudo access from the cpanel
- Type in sudo yum install git (full guide see here)
- Create your repository directory (mkdir ./yourrepo.git)
- Change to the directory you just created (cd ./yourrepo.git)
- Setup the repository by typing ‘git –bare init’ when you’re in the directory and you’re done
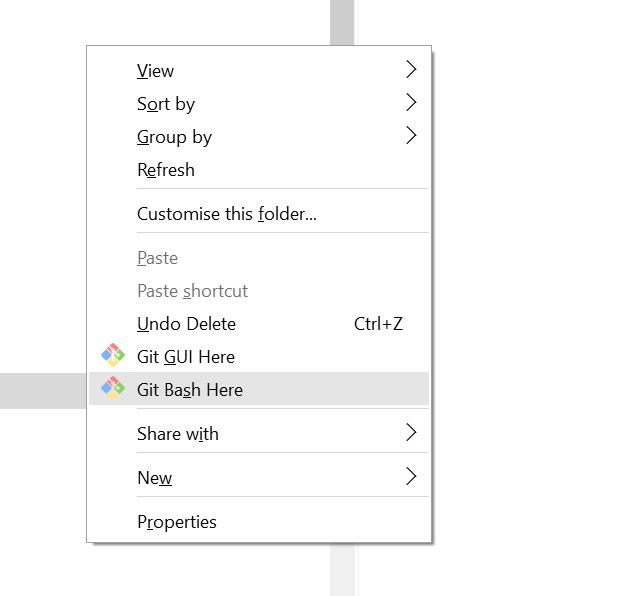
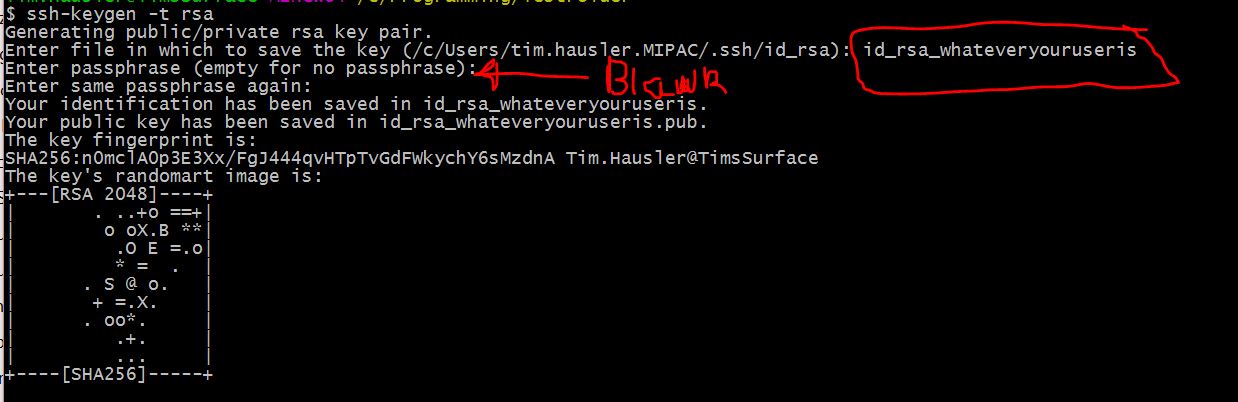
- Install GIT on your PC/ MAC/ Whatever, there are many instruction guides but the most important thing is that once everything is installed create public and private keys using the GIT bash. To do this:
- Following most online guides people are using the primary domain user from Bluehost as the GIT login. This user has unlimited SSH power over your server and giving this to all of the programming members is a bit insane. However I hadn’t realised that the Bluehost cpanel doesn’t give you any ability to create new users or public keys for separate users. Instead I (and you should too) just did this via SSH using the adduser and passwd commands. This was straight forward until it progressed to the ‘how to generate the public and private keys’.
You’ll have to make the keys and setup the config manually yourself. This is quite straight forward once I read the following article here. This is based on DigitalOceans servers but the guys gives you the manual commands you need. One thing to note is that you are best to create the public and private keys using GITs command line, ssh-keygen will run on the server and would work but at least you’ll be confident that GIT will work as there are many confusing moments. I followed this all carefully and made sure it was all ok, but somehow in the end I had the incorrect permissions on the files and the private keys did not work. Make sure your files look like those below, if they don’t, it won’t work:
[git@server .ssh]$ ls -la
total 20
drwx—— 2 git git 4096 Feb 14 07:59 .
drwx—— 5 git git 4096 Feb 14 07:24 ..
-rwx—— 1 git git 405 Feb 14 07:59 authorized_keys
-rwx—— 1 git git 1679 Feb 14 07:57 id_rsa_git
-rwx—— 1 git git 405 Feb 14 07:57 id_rsa_git.pub
[git@server .ssh]$- If you need multiple private keys and want to make things a little easier you can add a config file to your ‘c:\users\yourname\.ssh’ directory as per below
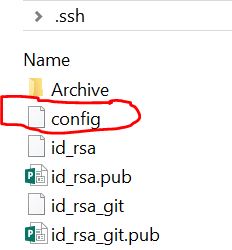
- and put the following text in it
———————-
Host yoursite.com
HostName yoursite.com
Port 22 (or different port if SSH is on a different port)
User git (or whatever you GIT username is)
IdentityFile C:\Users\yourusername\.ssh\id_rsa_git
—————–
- If you need multiple private keys and want to make things a little easier you can add a config file to your ‘c:\users\yourname\.ssh’ directory as per below
- At this point you will have GIT setup, a new user and some private keys installed in the right directories and all you need to do is understand what GIT is, which is pretty obvious when you:
- Right click, select ‘create new repository’ in your programming directory
- Copy your source code into the folder and sub-folders (however you want to set it up)
- Stage commit all your new files
- Add a signature
- Click commit
- Click push
- You now have a project which is ready to be pushed onto the Bluehost server and all your friends
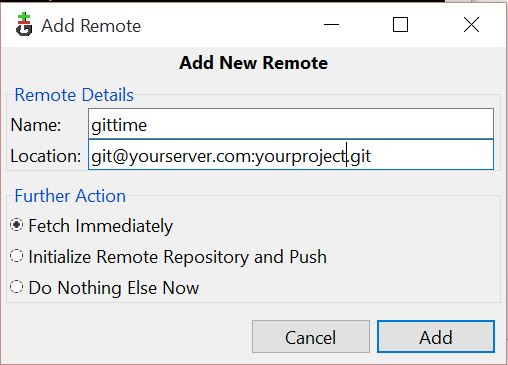
- Ok, now the part which combines everything and hopefully works for you – add a remote. This is poorly explained but see below:
- It needs to work like ‘username@yourserver.com:yourprojectfolder.git’ (I believer you don’t need the ‘.git’ in the folder name but I guess it just lines everything up). When you press ‘add’ it will either work or give you an error. If it works the dialogue will disappear and it will not be visible in any dialogue anymore except in the ‘Push’/ ‘Fetch’ commands.
- If you want to remove the a ‘remote’ then you’ll have to do it through the GIT bash. See this guide for more details.
- It needs to work like ‘username@yourserver.com:yourprojectfolder.git’ (I believer you don’t need the ‘.git’ in the folder name but I guess it just lines everything up). When you press ‘add’ it will either work or give you an error. If it works the dialogue will disappear and it will not be visible in any dialogue anymore except in the ‘Push’/ ‘Fetch’ commands.
- Push your changes toward the server and hopefully if all of your setup is complete you should have your code synchronised. When you’re ready to unleash this on you friends/ colleagues, send them the private key and they can the work and synchronise they jobs as well.
And that’s about it, I had struggled to find all this information in one place as the tasks cover Bluehost, Centos and GIT all of which are a bit disparate.
Tim